")
The Visonic Next+ K9-85 SMA is a PowerCode wireless digital PIR detector designed to enable homeowners to secure their homes while allowing their pets to move freely anywhere in the house. Employing Visonic’s patented “”Target Specific Imaging™”” optical system (TSI) and unique pet identification software algorithm, the Next+ K9-85 SMA has an unprecedented capacity to reliably distinguish between human bodies and pets weighing up to 38 kg (85lb).
Next+ K9-85 SMA is a fully supervised wireless detector with anti-collision PowerCode technology. It is compatible with PowerMax®; and all Visonic PowerCode; wireless panels and receivers. Next+ K9-85 SMA implements a whole new generation of patented technologies including FM Digital Signal Processing (FM-DSP), “”True Motion Recognition””™ with Fuzzy Logic algorithm”” (TMR), and state-of-the-art 3D cylindrical optics.
Specifications Installation Pairing Resetting
Features and Specifications
- Pet-tolerant for animals up to 38 kg (85 lb)
- 15m (50 ft) 90o multiple-curtain coverage with creep zone
- Enhanced false alarm immunity by combined Fresnel and cylindrical optics
- 3 Volt long life high power standard Lithium battery
- Long-term stability and reliability thanks to advanced true digital FM processing
- Industry’s best catch performance based on proprietary Target Specific Imaging and 3D cylindrical optics
- Ultimate false alarm immunity based on patented True Motion Recognition with exceptionally high sampling rates and “”Event Verification”” algorithm
- Fast and easy adjustment-free installation
- Attractive sleek design suitable for any home or office environment
Technical Specs
- Battery Type: CR123A, 3V
- Battery Life: 2.2 years
- Dimension: 3.69 x 2.5 x 2.06 in
- Operating Temperature: Exterior: 14°F to 122°F
Installation
General Guidance for Installation
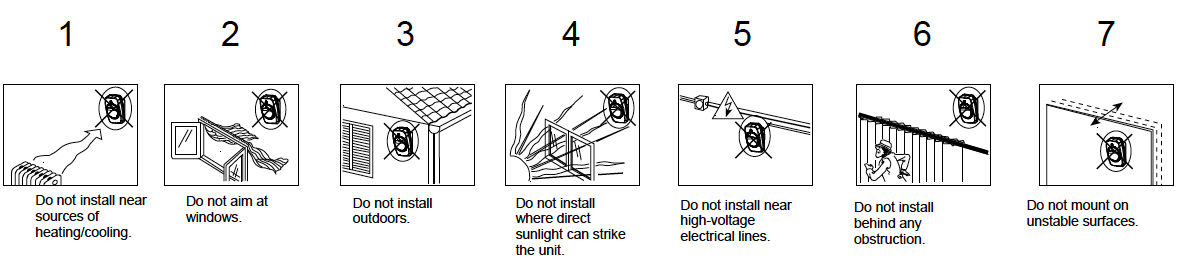
1. Do not install near sources of heater/cooling.
2. Do not aim at windows.
3. Do not install outdoors.
4. Do not install where direct sunlight can strike the unit.
5. Do not install near high-voltage electrical lines.
6. Do not install behind any obstruction.
7. Do not mount on unstable surfaces.
Installation Procedures
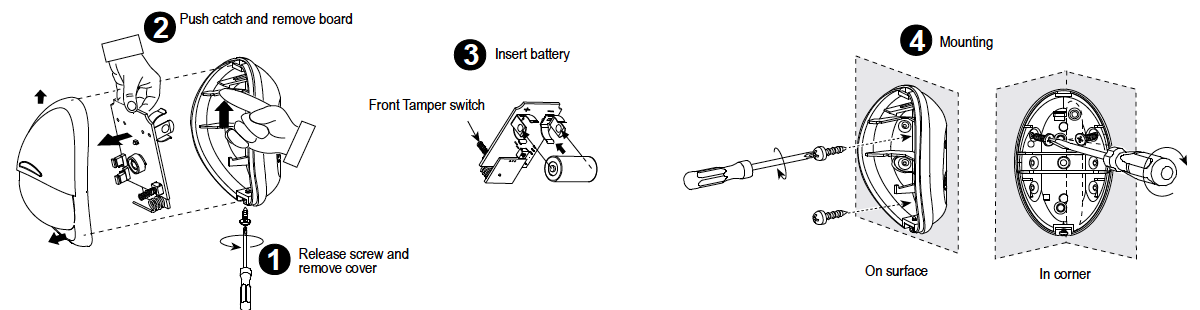
For battery installation, see steps 1-3 below. For mounting the detector, see step 4 below.
Note: The detector transmits a low battery signal upon detection of low voltage. It is recommended to wait about 1 minute after battery removal, before inserting the new battery.
Battery Installation:
1. Remove the screw from the bottom of the detector and remove the outer cover.
2. Push the catch(small tab at the top of the circuit board) and remove the circuit board.
3. Insert the battery.
Mounting Instructions:
4a. If using double sided tape, place tape on the device in a way that the tape will make solid contact with the device and the wall when positioned in it’s final location.
4b. If using screws, use the screw holes on the angled sides if installing in a corner, or on the flat back if installing flat against a wall.
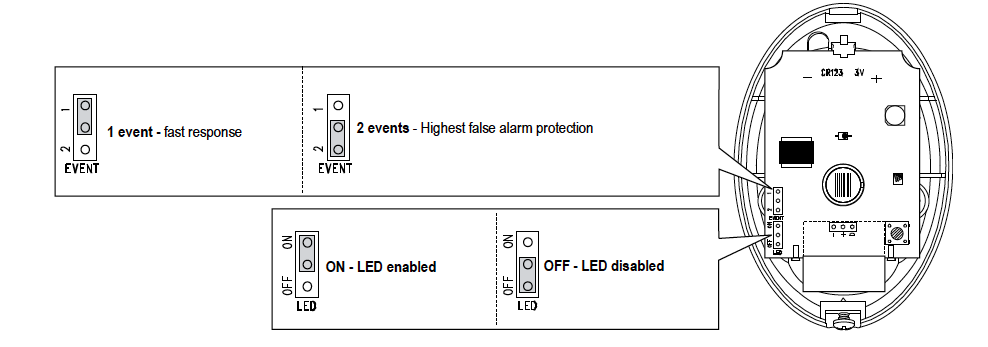
Jumper Settings
The K9-85 has two jumpers located on the circuit board. The top jumper can be used to tell the detector how many events to detect before reporting a motion event to the hub. The second jumper tells the detector whether to flash the LED on the front of the device when it detects motion.
Walk Test
Walk in front of the motion detector in both directions. The LED should light for 2-3 seconds each time your motion is detected. (Keep in mind that the detector will sleep for 2 min after detecting motion in an effort to save battery life.)
Important! Walk test at least once a week to verify proper function of the detector.
Pairing
Sensors can be added to your system during activation, or at a later time. If you want to add a sensor that was not included with the original Touchstone package, make sure your service provider supports it.
Note: If you are attempting to pair a sensor that has been previously deleted from the Hub, it will be necessary to default the sensor.
To add a sensor, click SETTINGS on the toolbar to display the Settings page. The number in the upper right hand corner of each icon indicates how many instances of that type of device have been installed already.
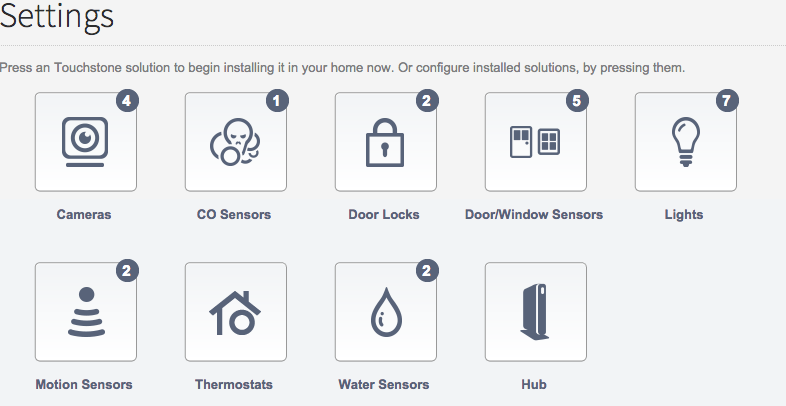
Click the type of sensor you want to add(i.e. door/winow, motion, etc) to display the sensor’s settings.
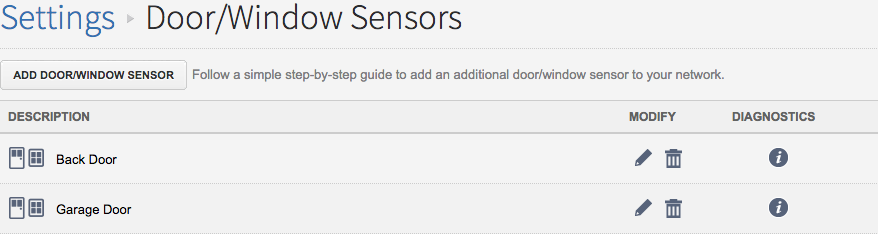
Click Add Door/Window Sensor(or whichever type of sensor you are attempting to add) and follow the on screen prompts.
Resetting
Open the cover by loosening the small screw at the bottom of the sensor and expose the circuit board and remove the circuit board.

Locate the battery on the back side of the board and remove it. With the battery removed, press and hold the tamper spring. Reinsert the battery and immediately release the tamper spring and press and release the tamper spring again.
The green LED on the circuit board will begin to flash once defaulted to signal that the device is ready to add to your system.