")
The water sensor allows users to around the clock remotely detect the presence of water to provide early detection of costly leaks and floods that could be caused from sump pumps, water heaters, air conditioners, heavy rains, and more.
The SMCWA10-Z consists of a Zigbee transceiver unit, 20ft cable, and a probe for convenient deployment in homes. The 20 foot cable provides ample length but can be cut to size as needed.
When water comes into contact with both pins on the probe, it closes a circuit within the transceiver. A signal is sent to the control panel setting off an alarm.
Specifications Installation Pairing Resetting
Features and Specifications
- Small form factor for discreet installation
- Easy to mount with included dual-sided tape or by screws
- Lithium battery for long life
- Low battery indication
- Tamper switch for added protection
- LED indicator shows sensor paired and unpaired status
Technical Specs
- Battery Type: CR2, 3V
- Battery Life: 9.5 years
- Dimension: Transceiver: 2.75 x 2 x 0.8 in Probe: 1.4 x 0.5 x 0.4 in
- Operating Temperature: 32°F to 104°F
Installation
Find a suitable location for the wireless radio.
Note: For best signal strength, place the wireless radio as high as possible.
Find a suitable location to place the water sensor probe. Examples include baseboards, drip pans, etc. Placement should be as close to the surface as needed. The sensor is triggered as soon as water touches across both metal probes. They do not need to be immersed to work.
Note: The probe should not touch a surface made from conductive materials such as metal. Note: Purified or filtered water can be highly resistive. To detect purified or filtered water, it may be necessary to sprinkle salt on the surface near the probe. The water will mix with the salt to increase the conductivity of the water.
Use the two longest of the supplied screws to fasten the probe to the wall. Or, clean the area and use the double-sided tape to fasten the probe to the wall.
Attach the wireless radio to the wall. Clean the area where the unit will be attached and then use the double-sided tape to secure the back of the water sensor to the wall. Or, squeeze the two tabs on the sides of the wireless radio housing and pull off the cover. Use the shorter screws to fasten the back plate to the wall. Snap on cover.
Note: We recommend you use the two supplied screws to fasten the base to the wall.
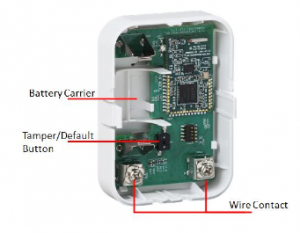
Based on the location of the wireless radio and probe, cut and strip the wire to a sufficient length to connect the probe. Attach the U-shaped crimps to the ends of the wire.
Attach the crimps to the probe as follows; Loosen the screws from the center holes of the probe. Insert the U-shaped crimps between the screw head. Fasten the screws snuggly without over tightening. Note: Wires do not have any polarity and may be attached to either terminal on the probe.
Testing
After installing the SMC Wireless Water Sensor, test it.
- Moisten a paper towel and place over the tip of the sensor until your Touchstone system reflects a status change in the portal or mobile app..
- If the Touchstone system does not reflect a status change, check the following:
Your battery may be old, dead, or incorrectly installed.
The sensor may not be moist enough or it may be damaged.
The probe’s metal prongs must touch continuous water to trigger a status change. For instance, if the prongs each touch separate pools of unconnected water, no change will be reflected.
- Be sure the sensor is thoroughly dry following this test. Then, place it in its final position.
Pairing
Sensors can be added to your system during activation, or at a later time. If you want to add a sensor that was not included with the original Touchstone package, make sure your service provider supports it.
Note: If you are attempting to pair a sensor that has been previously deleted from the Hub, it will be necessary to default the sensor.
To add a sensor, click SETTINGS on the toolbar to display the Settings page. The number in the upper right hand corner of each icon indicates how many instances of that type of device have been installed already.
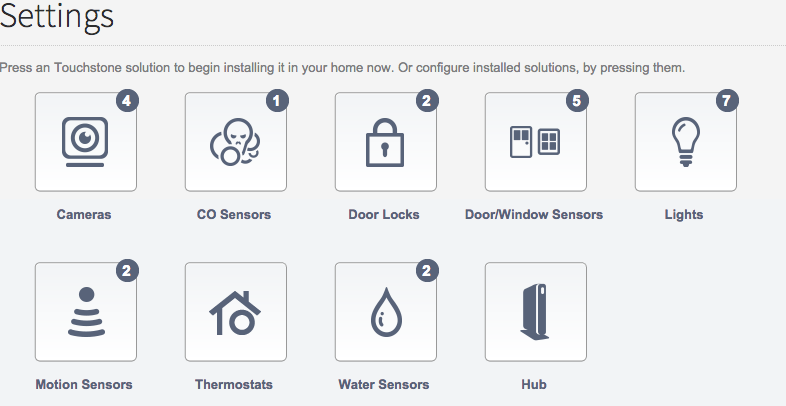
Click the type of sensor you want to add(i.e. door/winow, motion, etc) to display the sensor’s settings.
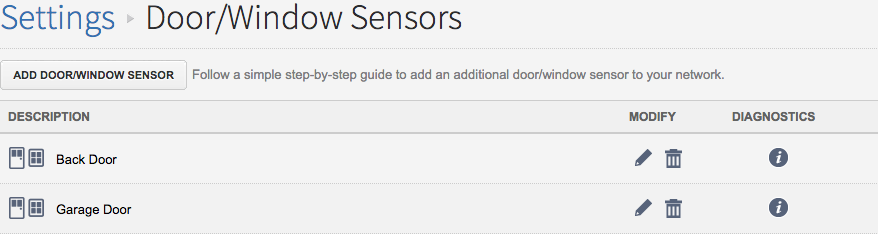
Click Add Door/Window Sensor(or whichever type of sensor you are attempting to add) and follow the on screen prompts.
Resetting