
Specifications Installation Pairing Resetting
Features and Specifications
- Very small, thin form factor able to blend into the decor of most installations
- Easy installation using high-strength 3M mounting tape (included)
- Wide Gap performance able to be installed in tough situations where magnet gap is over 1″
- Battery level data routinely transmitted. Low battery condition also transmitted.
- Environmental Temperature measurement
- Tamper alert is reported when a tamper event occurs and in any subsequent message, until the tamper switch is restored.
- Battery Life estimated at 3 years (for typical use).
Technical Specs
- 3V Lithium battery, type CR2032
- 66 x 25 x 10 mm (2-9/16 x 1 x 6/16 in.)
- 0c to 55c (32F to 131F)
Installation
Mounting
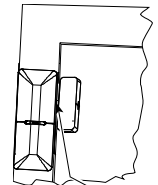
It is highly recommended to attach the transmitter to the top of the door/window on the fixed frame and the magnet to the movable part (door or window). Make sure that the magnet is located not more than 6 mm (0.25 in.) from the transmitter’s marked side. The transmitter should be mounted on the fixed surface and the magnet on the moving surface.
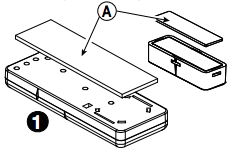
Peel away the release liners from the two strips of double sided adhesive tape(A) and attach to the device and magnet(1).
Align the device with the magnet according to the location marks and fasten the device and magnet to the mounting surface. The transmitter should be mounted on the fixed surface and magnet on the moving surface.
Battery Replacement
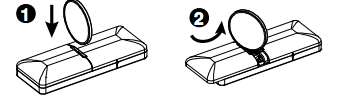
1. Insert a quarter or other coin in the slot as shown in the drawing and push downward firmly into the slot. 2. Twist to remove the cover.
3. Remove the old battery using a 3 mm flat-edged screwdriver. 4. Insert the battery at an angle, as shown in the drawing, while observing battery polarity. Note: The required battery is CR2032 Lithium 3V, manufactured by VARTA or another UL recognized manufacturer, purchased from a Visonic-approved supplier.
Pairing
Sensors can be added to your system during activation, or at a later time. If you want to add a sensor that was not included with the original Touchstone package, make sure your service provider supports it.
Note: If you are attempting to pair a sensor that has been previously deleted from the Hub, it will be necessary to default the sensor.
To add a sensor, click SETTINGS on the toolbar to display the Settings page. The number in the upper right hand corner of each icon indicates how many instances of that type of device have been installed already.
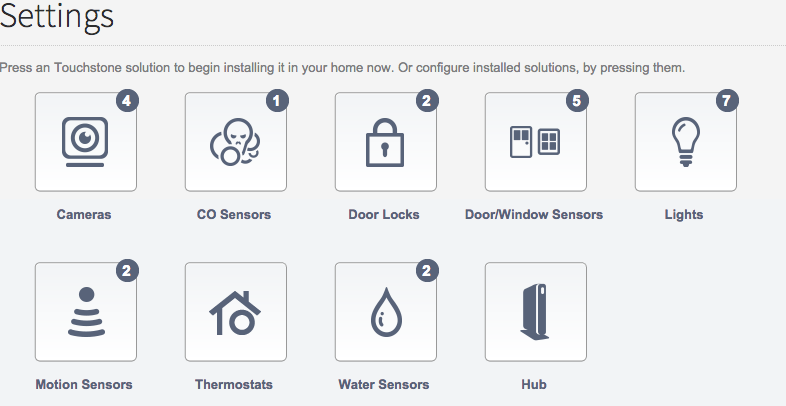
Click the type of sensor you want to add(i.e. door/winow, motion, etc) to display the sensor’s settings.
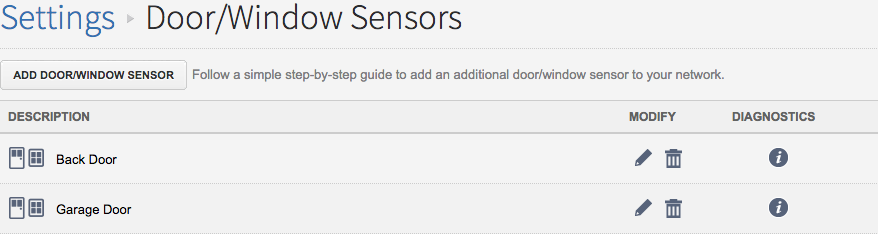
Click Add Door/Window Sensor(or whichever type of sensor you are attempting to add) and follow the on screen prompts.
Resetting
The MCT-340 Door/Window sensors are used for monitoring entry and exit areas of your home, as well as perimeter areas, the same way the full size contacts are. The door/window sensor can be placed on any door or window. Be sure to place the smaller magnet on the part of the surface that will have the least amount of motion(i.e. place the magnet on the door, and the larger part of the sensor on the door frame).
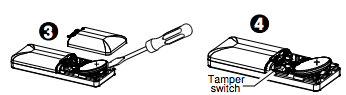
To default the MCT-340 door/window sensor, remove the cover using a quarter or small coin.
1. Insert a quarter or other coin in the slot as shown in the drawing and push downward firmly into the slot.
2. Twist to remove the cover.
Remove the battery and press and hold down the tamper switch(small black button near battery). With the tamper switch still held down, insert the battery and release the tamper switch within 4 seconds.
The LED will begin to flash once the sensor is defaulted to signal that is ready to be added to your system.