")
The CentraLite Azela Thermostat is designed to interoperate with other certified ZigBee HA 1.1 devices. The thermostat was designed from the ground up with interoperability in mind. Its simplistic interface makes it easy for the end user to understand and operate.
The thermostat is also designed to take complete advantage of any manufacturer’s ZigBee Home Automation™ gateway by allowing the gateway to set the schedules in the thermostat. An onboard HOLD button on the thermostat makes it easy for the user to disable any schedules in the event they are home during a scheduled “away” period. A built-in power amplifier ensures exceptional range in any residential or commercial exceptional range in any residential or commercial environment.
Specifications Installation Pairing Resetting
Features and Specifications
- Easy compatibility with other manufacturer’s ZigBee HA devices
- Long lasting 2 year battery life (with normal operation)–4AA Batteries or common wire can be used for 24VAC
- User friendly control
- Over the air updates for both the ZigBee™ and thermostat processor
- Can control up to 2 stages of heat and 2 stages of cool• Can control up to 2 stages of heat and 2 stages of cool
- Can control both electric and gas systems (24VAC or millivolt)
- Built-in power amplifier for exceptional range
Technical Specs
- Battery Type: Common Wire (24 VAC) and/or 4-AA batteries
- Battery Life: 2-3 years
- Dimension: 5.5″W x 4.5″H x 1.25″L
- Operating Temperature: 0° to 40°C
Installation
Before you begin installing your thermostat, please be advised that It is always a good practice to consult the owner’s manual for your HVAC system. If necessary, consult an HVAC technician to ensure proper installation.
Locating the Thermostat
If this is to replace an existing thermostat, just use the existing thermostat location.
If this is a new install follow these suggestions:
- Locate the thermostat about 5 ft. off the floor away from direct sunlight, lamps, radios, televisions, fireplaces, hot water pipes, or other heating or cooling sources.
- Do not locate the thermostat near doors to the outside or windows.
- Do not locate the thermostat in a damp area.
- Do not locate the thermostat in an area that lacks air circulation.
Remove Existing Unit
- Switch OFF the electricity to the HVAC unit.
- Remove the cover to the existing thermostat
- Make a note of the terminal location for each wire connected to the thermostat wiring terminals. Wire colors are not standard so it is important to note the terminal label each wire is connected to on the existing thermostat. It is ALWAYS a good idea to take a picture of the way your original thermostat is wired prior to removing the wires.
- While removing each wire from the existing thermostat wiring terminal, make sure to secure the wire so that it does not fall back into the wall.
- Once all wires are removed from the existing thermostat wiring terminal, remove the existing thermostat from the wall.
- Make sure to leave at least 3” of wire for each connection onto the CentraLite thermostat wiring terminal.
- Remove 1/8” insulation from the end of each wire.
Installing The Thermostat
- Place each wire in the appropriate wire terminal. The wiring terminal is labeled as follows:
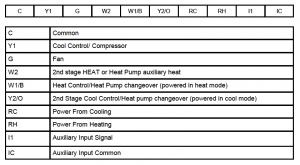
- By default the CentraLite thermostat comes with a wire jumper connecting the RH and RC power terminals. On most units only one power source is used and can be connected to both RH and RC. But if you have a millivolt system or other type of HVAC system it may require separate power sources for Heating and Cooling. In this case you will remove the jumper and separately power RC and RH.
- The CentraLite thermostat can be powered by 4 AA batteries or by the power from the 24V off the HVAC unit if a Common wire is available. Even if you use the common wire for power you should still install 4 AA batteries as a backup for the thermostat time clock.
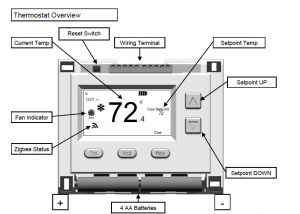
- Connect the wires to the terminal at the top of the thermostat. Note that the wires must route around the back of the ther-mostat into the wall.
- Hold the thermostat up to the wall in the desired position. Mark where the 4 holes are to be drill. Drill 4 3/16 holes for the wall anchors.
- Use the included wall anchors and screws to mount the thermostat securely onto the wall.
- Install 4 AA batteries into the battery compartment at the bottom of the thermostat.
- Snap the outer cover onto the thermostat.
Thermostat Configuration
- From the factory the thermostat comes configured to work with single stage Cool/Heat, Single Speed Fan systems.
- If your HVAC system is different refer to the programming section to configure the thermostat for your system.
- If you have separate power for RH and RC then you will need to remove the factory installed jumper between RH and RC.
Once the thermostat is powered on, the ZigBee Status indicator will begin to flash indicating that the thermostat is ready to be joined to your home automation system. Return to the activation flow to pair your thermostat.
Once you have completed the installation process, return to the activation flow to add your device to your system.
Pairing
To a Hub
You can add a thermostat when you activate Touchstone, or at a later time. If you want to add a thermostat that was not included with the original Touchstone package, make sure your service provider supports it.
To add a thermostat, click on SETTINGS in the toolbar.
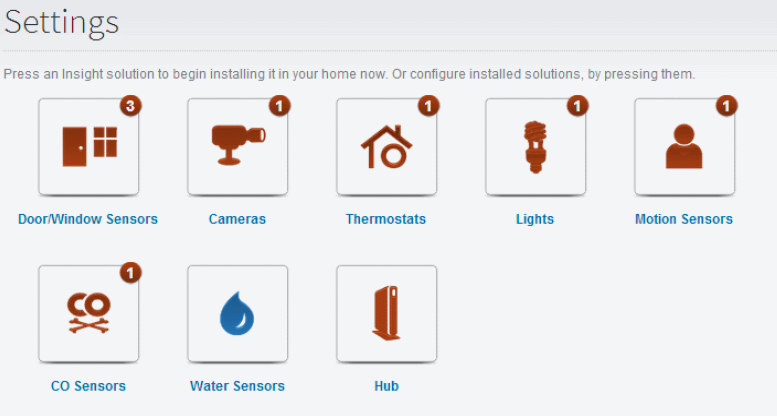
Click Thermostats to display the thermostat settings screen.
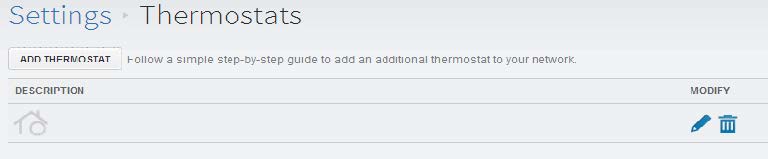
Click Add Thermostat and follow the onscreen prompts.
To a Touchscreen
From the main page of the Touchscreen, touch the Settings Icon  and enter your 4 digit master code. This is the code that you use to arm and disarm your system.
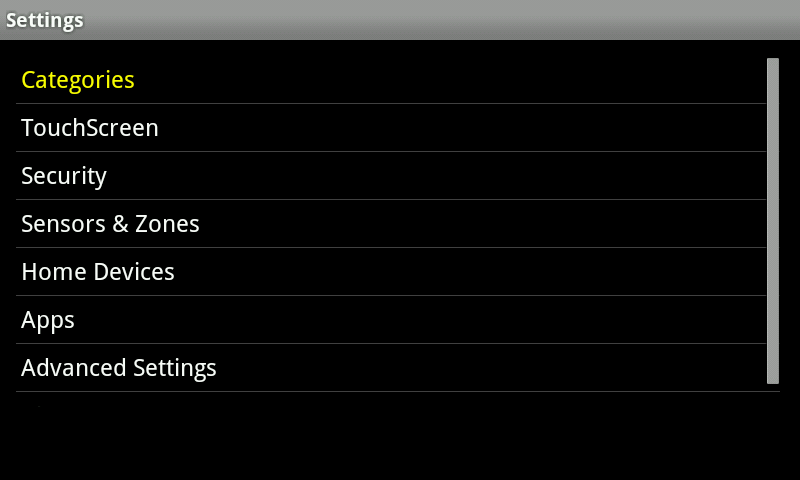
- Choose ‘Home Devices’ from the categories page.
- Select the device you wish to pair(Thermostat), select “Add Thermostat” and click Next.
- Make sure that your device is installed and powered on. As the Touchscreen discovers your devices, they will appear on the screen.
- Once your devices are found, select “Done” and follow the onscreen prompts.
Resetting

- To default the thermostat, first remove the thermostat cover and batteries.
- Place two batteries into the thermostat(the positive terminals will face left)
- Press and hold the reset button(top left) and the hold button(bottom center).
- Release the reset button while keeping the hold button depressed. When the screen begins to come back on, release the hold button. The zigbee network icon will begin to flash.
Testing
Testing Thermostat Operation
- After completing any necessary configuration make sure the thermostat is in Cool mode by pressing the MODE button until Cool is displayed at the bottom of the screen.
- Make sure the system is not calling for Cooling by setting the setpoint several degrees above the room temperature. Then check the Fan operation by pressing the Fan button. When the Fan indicator is illuminated without the Auto indicator then air should blow from the unit.
- Now make sure the Fan mode is in Auto and run the setpoint temperature at least several degrees below the room tempera-ture. Give the thermostat at least 3 minutes to respond.
- Now change the system mode to HEAT. Allow the system at least 3 minutes to respond. The Heat(flame) mode symbol should illuminate and system should be blowing hot air.