Mounting and Installing
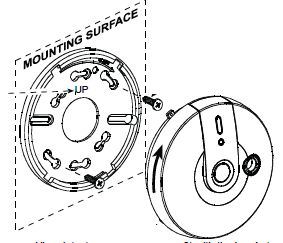
The sensor can be mounted on a wall or ceiling. For EN approved sites, only ceiling installation is allowed. It must be mounted with its bracket (when it is attached to its bracket the tamper switch is pressed and the sensor automatic reset is performed).
1) Locate the bracket on mounting surface so that the word “UP” is located as shown (so that the sensors stickers text will be easily readable).
2) Mark and drill 2 holes in mounting surface. Fasten the bracket to the mounting surface with 2 screws.
3) Align sensors tabs with the bracket slots and rotate the sensor as shown. Pull the sensor to verify that is is securely attached.
Warnings
• Installation must be performed by a qualified individual. Failure to properly install, test and maintain a CO sensor may cause it to fail, resulting in loss of life!
• Installation of the CO sensor should not be used as a substitute for proper installation, use and maintenance of fuel burning appliances, including appropriate ventilation and exhaust systems.
• Unauthorized removal of the unit from the bracket will initiate a tamper alert!
TESTING
Press the test button until the built-in buzzer sounds 1 beep and the red, green and yellow LEDs flash sequentially. This means that the local test is successful.
WARNING
The test switch is the only proper way to test the CO sensor. Never use vehicle exhaust! Exhaust may cause permanent damage and void your warranty.
Choosing a Location to Install
Selecting a suitable location is critical for the CO sensor. The Consumer Product Safety Commission (CPSC) recommends to use at least one CO sensor per household, located near as possible to sleeping area of the home, because the human body is most vulnerable to the CO gas effect during sleeping hours. For added protection, install additional CO sensor in every separate bedroom and on every level of your home. If your bedroom hallway is longer than 14 meters (40 feet), install a CO sensor at BOTH ends of the hallway. Install an additional sensor 6 meters (20 feet) away from the furnace or fuel burning heat source.
Where NOT to Install
1. In location where temperature may be below -10°C (14°F) or above 40°C (104°F).
2. In locations where humidity is below 10% or above 93% RH.
3. Near paint thinner fumes.
4. Near air conditioners, furnaces, stoves, fireplaces and any other ventilation source that may interfere with the CO gas entering the sensor.
5. In locations where furniture or draperies may obstruct the air flow.
6. In exhaust streams from gas engines, vents, flues or chimneys.
7. Where dirt or dust could collect and block the sensor and stop its working.
8. In locations that can be reached by children.
9. In turbulent air from ceiling fans.
10. In close proximity to an automobile exhaust pipe – this will damage the sensor.
