")
A hard-wired, end-of-line (EOL) protected input can be used, with normally open (NO) and normally closed (NC) devices, for a variety of security and control applications. The MCT-302 SMA offers an additional back tamper switch for detecting removal of the device.”
Specifications Installation Pairing Resetting
Features and Specifications
- Auxiliary input for wired contacts
- User-selectable operation of auxiliary input as NC or EOL (end-of-line loop with NC or NO sensors)
- Back tamper switch detects removal from place (model MCT-302 T)
- Superior transmission range
- Fully supervised
- Long-life standard lithium battery included
- Low-battery signaling
Technical Specs
- Battery Type: 3 V Lithium CR-2 T type battery
- Battery Life: 2.6 years
- Dimension: 3.19 x 0.88 x 94 in
- Operating Temperature: Exterior: 32°F to 120°F
Installation
Auxiliary Input Wiring
Remember! If your application does not require the auxiliary input, be sure to set DIP switch SW2 to OFF and to short the input terminals together with a piece of jumper wire.
Connect the auxiliary detector’s alarm contacts across the MCT-302 auxiliary input terminals.
If the auxiliary input of the MCT-302 is defined as a Normally Closed (N.C.) type (SW2 set to OFF), series connected N.C. sensor contacts must be used exclusively. An E.O.L. resistor will not be required.
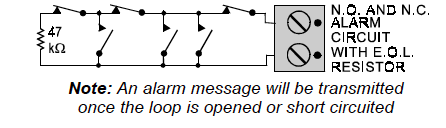
If the auxiliary input is defined as an E.O.L. type (SW2 set to ON), Normally Closed (N.C.) as well as Normally Open (N.O.) sensor contacts can be used. A 47kΩ E.O.L. resistor must be wired at the far end of the zone loop.
The Function Switches
Switch Tasks
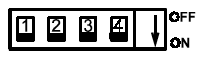
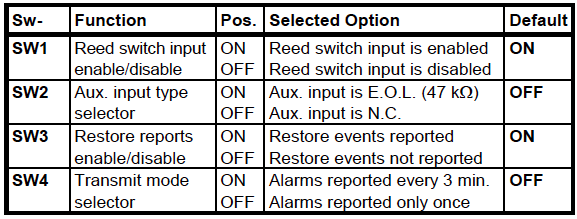
The MCT-302 has a 4-position DIP switch function selector. Each switch lever allows you to select one of two options.
Setting the Switches
Set the function switches as desired prior to applying power. Use a ball point pen or another pointed object to shift the switch levers. The ON position is indicated by the arrow on the switch body.
Pairing
Sensors can be added to your system during activation, or at a later time. If you want to add a sensor that was not included with the original Touchstone package, make sure your service provider supports it.
Note: If you are attempting to pair a sensor that has been previously deleted from the Hub, it will be necessary to default the sensor.
To add a sensor, click SETTINGS on the toolbar to display the Settings page. The number in the upper right hand corner of each icon indicates how many instances of that type of device have been installed already.
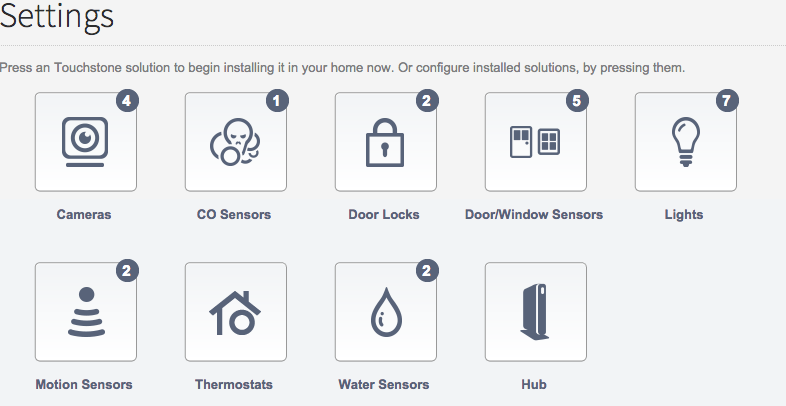
Click the type of sensor you want to add(i.e. door/winow, motion, etc) to display the sensor’s settings.
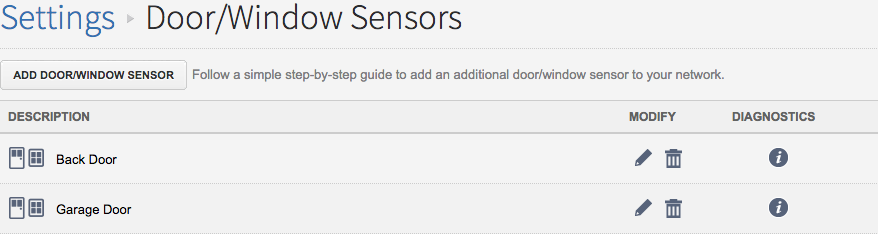
Click Add Door/Window Sensor(or whichever type of sensor you are attempting to add) and follow the on screen prompts.
Resetting
Remove the cover by loosening the screw on the top of the sensor. Remove the existing battery.
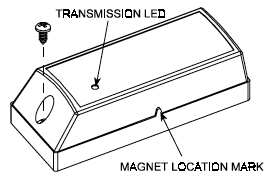
Press and hold down the sensor’s tamper switch(There may be a spring over the tamper switch. It is not necessary to remove the spring).
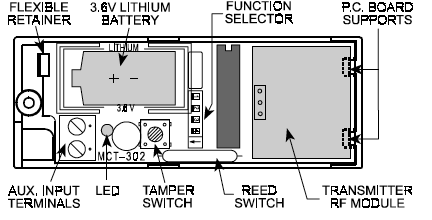
Insert the battery into the sensor and wait for the green LED to light.
Release the tamper switch within 4 seconds and press it again. When the sensor is defaulted, the green LED starts to blink.